
This post contains affiliate links. We may earn a commission if you purchase through these links, at no extra cost to you.
The first batch of tallow I ever rendered, I pulled off the heat about an hour too early. The fat looked golden enough on top, the kitchen smelled okay, and I figured the floating chunks were just normal. They were not. They were unrendered connective tissue and meat scraps still hanging on to a lot of moisture, and the jars I poured looked cloudy and never set properly.
Since then I have rendered a lot of batches and I have learned to trust four cues, not one. If three out of four say done, it is done. If only one says done, give it more time.
This is the checklist I use now. It works whether you are doing stovetop, oven, slow cooker, or Instant Pot.
Cue 1: Visual
This is the most reliable cue once you know what you are looking for.
Cracklings sink and turn golden brown. When you start rendering, the chunks of fat float on top of the small amount of liquid you have. As the fat melts out of them, they get denser relative to the surrounding oil. By the time they have given up almost all their fat, they sink to the bottom. They also turn from white-pink to a deep golden brown, the color of a well-cooked French fry.
If your cracklings are still floating, you are not done. If they are pale yellow or still showing pink, you are not done.
Liquid is clear amber, not cloudy yellow. Mid-render, the oil looks like cloudy chicken broth. As it finishes, water evaporates out and the oil clarifies. By the end, you should be able to see straight through the layer of fat down to the bottom of the pot. The color is a pale to medium amber, similar to good olive oil held up to a lamp.
If the liquid still looks milky or yellow-opaque, there is still water in there and it is not done.
No opaque white pieces remaining. Any chunk of fat still showing the original white color of raw suet has not finished rendering. Give it more time. Stir gently to bring those pieces into the hotter zones of the pot.
Cue 2: Smell
Smell is the cue that tells you when you are about to overshoot.
A correctly rendering batch goes through three smell phases.
Phase one (first 30 to 45 minutes). Sweet beefy aroma. Like a slow-cooked pot roast. This is the meat residue and connective tissue cooking down.
Phase two (next hour or so). That beefy smell mellows. It is still there but quieter. You start picking up a more neutral cooking-fat smell, like good restaurant fries. This is the goal zone.
Phase three (overcooking territory). A sharper, more burned, almost acrid edge. Like the smell of fat hitting a too-hot pan. If you start smelling this, pull it off the heat immediately. You are about to scorch the bottom and create dark flecks that will not strain out and will make your final tallow smell off.
If you are doing a covered render (Instant Pot, sealed slow cooker), you will not get much smell information until you open the lid. That is fine. Just lean harder on the visual and texture cues.
Cue 3: Temperature
If you have a thermometer, this is a useful confirmation.
The oil reading clear above 200F means most of the water has cooked off. Water boils at 212F and as long as there is water dispersed in the fat, the overall temperature will stay below or near that point. Once the water is gone, the temperature climbs quickly.
A safe finish-line temperature is 230 to 250F. Below 200F means there is still water you have not boiled off. Above 280F you are risking scorching and oxidation that hurts shelf life.
I do not always thermometer-check. The visual and smell cues are usually enough. But if I am doing a large batch or I am tired and not paying close attention, a probe thermometer in the oil saves me from a bad finish. I went deeper on this in the rendering safety and temperature guide and the rendering equipment guide covers the thermometers I keep around.
Cue 4: The Cold Plate Test
This is the one that has never failed me, and it is the test I use when I am not sure if all three other cues add up.
Put a small plate in the freezer for 10 minutes before you check. Pull it out. Spoon a tiny amount of the rendering fat (about a teaspoon, strained through a fine mesh sieve to leave the cracklings behind) onto the cold plate. Tilt the plate slightly so it spreads thin.
Wait 60 seconds.
If it is done: The fat solidifies firm and bright white within a minute. Tap it with a fingertip and it should feel solid, not greasy or sticky. The color should be uniformly white, not yellow-streaked or cloudy.
If it is not done: The fat stays softer, more translucent or slightly yellow. It may set but with a tacky, almost gel-like consistency rather than a clean solid.
This test exists because the finished texture of cooled tallow is the single best indicator of whether enough water has been driven off. Cold plate replicates the cooling that happens when you pour into jars. If it sets clean and white on the cold plate, it will set clean and white in your jars.
Pulling It Off the Heat
When your four cues line up, pull the pot off the heat.
Let it sit for 5 to 10 minutes off the heat with the cracklings still in. This lets the last few suspended particles settle out a little and makes straining easier.
Strain through a fine mesh sieve lined with a couple of layers of cheesecloth. I covered the full straining and filtering process in the filter and strain guide. For really clear final tallow, do it twice.
Pour into clean dry jars. Leave half an inch of headspace. Cap loosely until cool, then seal.
What If You Are Not Sure?
If three of the four cues say done but one is ambiguous, do a 15-minute extension. Keep the heat low, give it a stir, and re-check. Tallow is forgiving about a small over-render. The flavor and color get slightly darker but it is still good.
The one thing you cannot recover from is scorching. A burned batch is a lost batch. So if you are unsure, pull it sooner, do the cold plate test, and decide. You can always put it back on the heat. You cannot un-burn it.
If you are using a 4 lb grass-fed starter just to have a known good rendered tallow on hand while you practice on raw suet, that is the move I would recommend. Knowing what good rendered tallow looks, smells, and feels like makes every future batch easier to judge. The Traverse Bay 32 oz jar works for the same purpose for less money.
Common Mistakes I See
Pulling too early because cracklings look brown enough. Browned-looking cracklings on top can be misleading. Cut one in half. If the inside is still white, it is not done.
Pulling too late because you forgot about it. Set a timer at 90 minutes and check, then again every 30 minutes. The window between done and overcooked is real.
Trying to rush by raising the heat. Higher heat does not finish faster, it just scorches the bottom. Low and slow wins. I covered this and a bunch of other rendering mistakes in common rendering mistakes.
Skipping the strain. Even a clean-looking render has tiny particles that will turn the final tallow cloudy and shorten shelf life. Always strain.
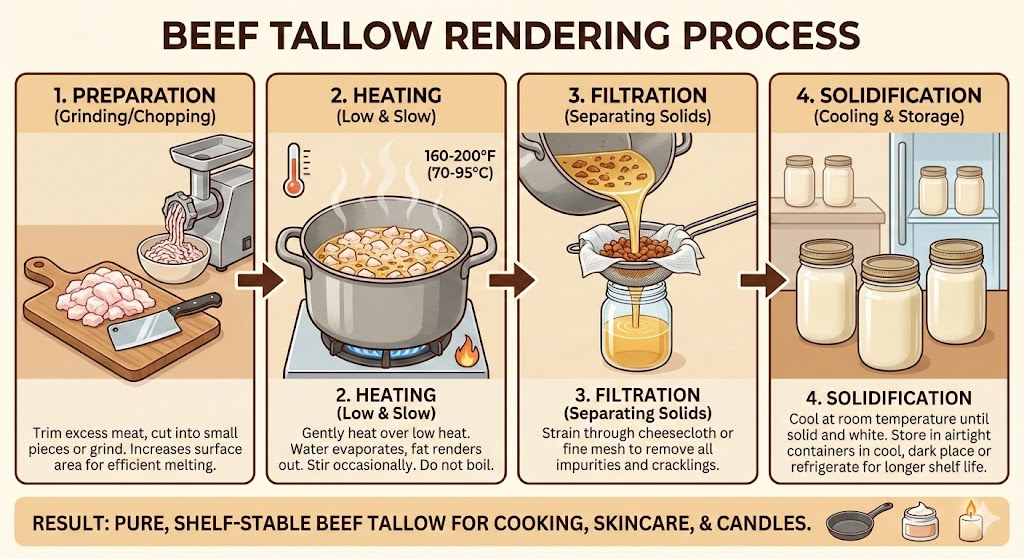
For a full step-by-step starting from raw fat, the render at home guide walks through the entire process from sourcing to storage.
Frequently Asked Questions
My cracklings sank but the oil still looks cloudy. Is it done?
Almost. Give it another 10 to 15 minutes uncovered to let more water steam off. Cloudy oil means water is still present. Sinking cracklings without clear oil is the in-between zone.
Can I leave it on too long?
Yes. Past about 260F sustained, you start oxidizing the fat and shortening shelf life. The color also darkens toward brown and the smell sharpens. A small over-render is fine. A big one tastes off and goes rancid faster.
Why does my finished tallow look yellowish even when it set firm?
Color depends partly on the animal’s diet and feed, partly on rendering temperature. Grass-fed tallow trends slightly more yellow due to higher beta-carotene. Higher rendering temperatures also pull color out of the meat residue. As long as it set firm and white-to-pale-yellow, it is fine. The color guide walks through what different shades mean.
Do covered and uncovered renders finish the same way?
Same end state, different timing and slightly different smell experience. Covered (Instant Pot, sealed slow cooker) holds water longer, so you may need a final uncovered finishing step at the end. Uncovered (stovetop, open oven) loses water faster but smells up the kitchen more.
Bottom Line
Four cues. Cracklings sink and turn golden brown. Liquid is clear amber. Smell is neutral fat, not scorched. Cold plate test sets firm and white. When three or four of those line up, you are done.
If you are new to rendering, do the cold plate test on every batch for the first month. It builds your intuition for what the other cues should look like at the finish line. After 10 batches, you will know it by sight and smell alone.
The full rendering process from raw suet through final jars lives at /blog/how-to-render-beef-tallow-at-home-step-by-step-guide/, and the oven vs stovetop comparison covers which method works best for the kind of batch you are running.